
Posterior Tibial Tendon Dysfunction Treatment That Works
Conservative care resolves most cases of posterior tibial tendon dysfunction (PTTD), and it should always be the starting point unless you have a tendon rupture or advanced, rigid deformity. Expect roughly 3 to 6 months of structured treatment before anyone reasonably talks about surgery. That window matters because tendon tissue remodels slowly, and rushing to the operating room skips a phase where most patients actually get better.
Three things to do right now if you have a fresh diagnosis:
- Modify activity and, if pain is severe, get fitted for a walking boot or brace as your provider advises.
- Start a supervised physical therapy program built around eccentric loading and intrinsic foot muscle strengthening, not just stretching.
- If you have not already had weight-bearing X-rays or an MRI, ask for them. Imaging determines your stage, and stage determines your treatment path.
Surgery generally becomes the right conversation when deformity is progressive or rigid (stage III or IV), when the tendon has ruptured outright, or when a genuinely structured conservative program has failed after that 3 to 6 month trial. Everyone else has a real shot at improving without an operating room.
Key Takeaways
Conservative treatment resolves most cases of posterior tibial tendon dysfunction within 3 to 6 months, and surgery becomes appropriate mainly for rigid deformity, rupture, or failed conservative care.
| Point | Details |
|---|---|
| Start conservative, stay patient | Give a structured program of bracing, orthotics, and eccentric strengthening a full 3 to 6 months before considering surgery. |
| Stage determines the plan | Stage I to II favors nonsurgical recovery; stage III to IV deformity is often rigid and typically needs surgical correction. |
| Exercise beats bracing alone | Orthotics combined with targeted strengthening outperform orthotics or stretching alone in controlled research. |
| Watch for red flags | Sudden inability to bear weight or rapid deformity change warrants same-day medical evaluation. |
| Manage comorbidities and footwear | Weight management, diabetes control, and supportive shoes measurably improve healing and outcomes. |
| Consider hands-on support | Thetxroom’s Fascial Distortion Model therapy can complement orthotic and strengthening programs during the conservative care window. |
Table of Contents
- Posterior Tibial Tendon Dysfunction Stages and Why They Drive Treatment
- Nonsurgical Treatment for Posterior Tibial Tendon Dysfunction
- When Should You Consider Surgery for PTTD?
- Surgical Options by Stage and What Recovery Looks Like
- What Rehab Looks Like After Treatment, Surgical or Not
- What the Evidence Says About Outcomes
- Warning Signs That Need Urgent Attention
- Where Hands-On Manual Therapy Fits Into PTTD Care
- How I’d Actually Manage This If You Were My Patient
- How Thetxroom Supports Nonsurgical PTTD Recovery
- Frequently Asked Questions
- Sources
Posterior Tibial Tendon Dysfunction Stages and Why They Drive Treatment
PTTD is staged I through IV, and the stage you’re in determines almost everything about what happens next. This is not a formality your podiatrist mentions in passing. It’s the single biggest factor separating “you’ll likely walk out of this with strengthening exercises” from “you’ll likely need reconstructive surgery.”
- Stage I involves tendon inflammation with pain but no visible deformity. The foot still looks and moves normally; the arch is intact. Treatment goal: calm the pain and start protecting the tendon before it degenerates further. Orthotics, activity modification, and early physical therapy usually do the job.
- Stage II brings a flexible flatfoot deformity. The arch collapses when you stand but can still be manually corrected or partially corrects when you rise on your toes. Treatment goal: restore dynamic support through strengthening while bracing offloads the tendon. This is the stage where the largest body of nonsurgical evidence applies, and it’s also where surgery, if needed, tends to be joint-preserving rather than fusion-based.
- Stage III deformity has become rigid. The flatfoot no longer corrects, even passively, and arthritic changes may show up in the subtalar joint. Treatment goal shifts from restoration to realignment, usually surgical, since a fixed bony deformity doesn’t respond to exercise the way a flexible one does.
- Stage IV adds ankle joint involvement, with the deformity affecting alignment above the foot itself. Treatment goal becomes salvage: pain relief and stability, often through fusion procedures that also address the ankle.
The pattern that matters most for you: earlier-stage PTTD responds far better to nonoperative care, while stage III and IV deformities are frequently too structurally fixed to improve without surgical correction. That’s the entire argument for catching this early and taking the conservative program seriously instead of pushing through pain for another year.
Nonsurgical Treatment for Posterior Tibial Tendon Dysfunction
A real conservative program isn’t “rest it and see.” It’s staged, measurable, and it changes over the 3 to 6 month window based on how you respond. Here’s how a structured plan typically unfolds.
Weeks 1 to 4. If pain is acute and significant, a walking boot or short leg cast can immobilize the tendon for 3 to 4 weeks, giving inflamed tissue a chance to settle before you load it again. Not everyone needs this step. Mild stage I cases sometimes skip straight to bracing and gentle loading. NSAIDs help manage pain and swelling during this phase, though they don’t change the underlying tendon pathology.
Weeks 4 to 12. This is where physical therapy earns its keep. The posterior tibial tendon is the primary dynamic stabilizer of the medial arch, which means passive supports like orthotics can only do part of the job. Eccentric loading exercises, resisted inversion, and heel raises progressively rebuild the tendon’s capacity to do its own work, supported by key injury prevention habits for tactical athletes focusing on progressive loading strategies. Therapy at this stage typically adds intrinsic foot muscle strengthening (think short foot exercises and toe curls) and gait retraining, since compensatory movement patterns often develop once the arch starts sagging.

Months 3 to 6. By now you should see measurable gains: less pain with daily walking, improved single-leg heel raise performance, and better tolerance for longer activity. If you’re not seeing progress by month 3, that’s the checkpoint to flag with your provider rather than waiting out the full 6 months hoping for a late turnaround.
| Nonsurgical Option | Best Fit | What It Does |
|---|---|---|
| Off-the-shelf orthotic inserts | Mild stage I symptoms | Reduces medial arch strain during standing and walking |
| Custom-molded orthotics or UCBL inserts | Stage I to early stage II | Provides more precise arch support for moderate collapse |
| Ankle-foot orthosis (AFO) | Stage II with more significant instability | Controls hindfoot motion and offloads the tendon more aggressively than a shoe insert |
| Walking boot or lace-up brace | Acute pain flares or early post-immobilization | Limits motion short-term while inflammation resolves |
| Supervised eccentric strengthening | All stages as pain allows | Rebuilds the tendon’s own load capacity, the piece bracing can’t replace |
A 2025 systematic review and meta-analysis found that orthotics combined with targeted strengthening produced significantly better outcomes than orthotics or stretching alone, reporting a P value below 0.0001. That’s a strong statistical signal, and the clinical takeaway is straightforward: a brace by itself is a management tool, not a fix. Orthotics reduce strain and pain, but they don’t correct structural deformity on their own. Active strengthening is what builds the secondary support that can help you avoid surgery altogether.
Two more pieces round out a real conservative plan. First, footwear matters more than people expect. Shoes with structured heel counters and adequate arch support reduce the workload on an already-stressed tendon. Second, comorbidity management counts as treatment, not an afterthought. Obesity, diabetes, and hypertension are documented risk factors that also slow healing, so weight management and blood sugar control genuinely influence how fast you recover.
Here’s the conservative timeline as a step-by-step plan:
- Get diagnosed and staged with a clinical exam and imaging.
- If pain is severe, immobilize for 3 to 4 weeks in a boot or cast.
- Begin supervised physical therapy emphasizing eccentric loading and intrinsic strengthening.
- Get fitted for an appropriate orthotic or brace based on your stage.
- Reassess at 6 to 8 weeks; adjust exercise intensity and bracing as needed.
- Continue progressive strengthening through month 3, tracking pain levels and function.
- At months 3 to 6, evaluate whether you’ve hit meaningful functional milestones or whether surgical consultation is warranted.
Pro Tip: Eccentric loading works, but progressing too fast is the most common way patients stall their own recovery. A reasonable rule: mild discomfort during exercise that settles within 24 hours is acceptable; sharp pain that lingers into the next day means you dial back load or repetitions before adding more, not after.
When Should You Consider Surgery for PTTD?
Surgery enters the conversation under a handful of specific circumstances, not as a default fallback when conservative care feels slow.
- Structured conservative treatment has genuinely failed after 3 to 6 months of consistent effort, not a few weeks of half-hearted stretching.
- The deformity is progressive or has become rigid, placing you in stage III or IV territory.
- Imaging or clinical exam confirms an acute full-thickness tendon rupture.
- Pain remains intractable despite proper bracing and activity modification.
- Functional limitation is severe enough to interfere with basic daily walking, not just athletic activity.
Several other factors shape the decision beyond the raw indication. Age and activity level matter: a younger, active patient with stage II disease might push harder for joint-preserving surgery, while an older, lower-demand patient might tolerate bracing longer. Comorbidities like obesity and diabetes affect healing capacity and complication risk, so your surgeon will weigh those before recommending a specific procedure. Weight-bearing X-rays and MRI or ultrasound findings, showing the degree of tendon degeneration or confirming rupture, give the surgical team the objective data they need.
If you’re heading toward a surgical consultation, come prepared. Bring copies of your imaging, a written log of what conservative treatments you tried and for how long, and a clear description of your functional limitations (can’t walk a mile, can’t stand at work, can’t play a specific sport). Ask directly whether a staged approach, addressing soft tissue first and bone alignment later if needed, applies to your case.
Surgical Options by Stage and What Recovery Looks Like
Surgical strategy tracks the same staging system used for nonoperative care, and procedures range from motion-preserving tendon work to full joint fusion.
Stage I procedures center on debridement and tenosynovectomy, cleaning out inflamed or degenerated tendon sheath tissue, sometimes paired with tubularization or direct repair if the tendon itself shows partial tearing. These are chosen when conservative care hasn’t resolved pain but the tendon architecture and alignment are still largely intact.
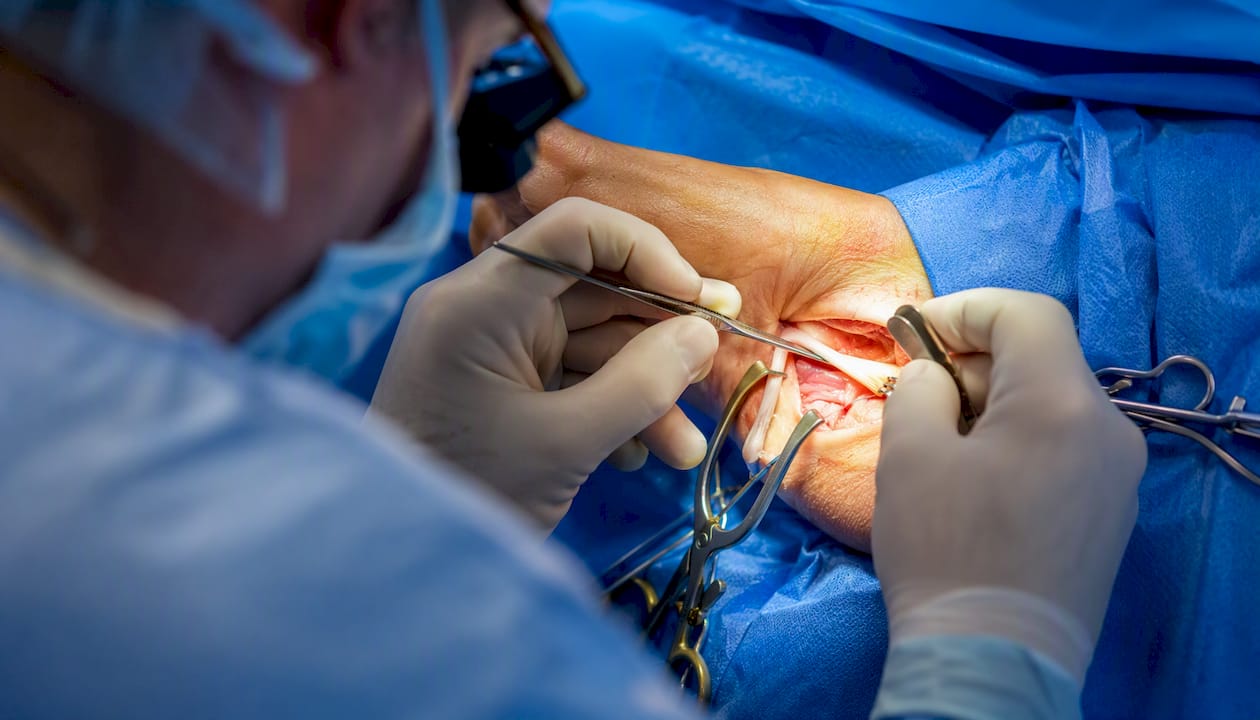
Stage II procedures typically combine soft tissue and bony work. A flexor digitorum longus (FDL) tendon transfer replaces the failing posterior tibial tendon’s function, often paired with a medializing calcaneal osteotomy to shift the heel back under the leg, or lateral column lengthening to correct forefoot abduction. Spring ligament repair or reconstruction gets added when that supporting structure has also failed. Surgeons combine these because the tendon transfer alone can’t correct bony malalignment, and the osteotomy alone doesn’t restore active dynamic support.
Stage III and IV procedures move into arthrodesis territory: subtalar fusion, triple arthrodesis (subtalar, talonavicular, and calcaneocuboid joints), or medial double arthrodesis. When ankle arthropathy is present in stage IV, a staged approach may address the hindfoot first and the ankle separately. The trade-off is real and worth understanding: fusion eliminates the arthritic motion that’s been causing pain, but it also permanently eliminates motion at that joint. For a rigid, painful deformity, most patients find that trade worthwhile.
| Procedure Type | Typical Stage | Approximate Recovery |
|---|---|---|
| Debridement/tenosynovectomy | Stage I | 4 to 6 weeks protected weight-bearing, full recovery by 2 to 3 months |
| FDL tendon transfer with osteotomy | Stage II | 6 to 8 weeks non-weight-bearing, progressive rehab through month 4 to 6 |
| Lateral column lengthening | Stage II | Similar to osteotomy, often 8 weeks protected weight-bearing |
| Subtalar or triple arthrodesis | Stage III to IV | 6 to 12 weeks non-weight-bearing, full functional recovery often 6 months |
| Staged ankle procedures | Stage IV with ankle involvement | Extended recovery frequently lasts 12 months across staged surgeries |
Common complications to watch for include wound healing delays (more likely with diabetes or obesity), nonunion at fusion sites, nerve irritation, and persistent stiffness. As Cleveland Clinic notes, post-surgical rehabilitation commonly adds another 2 to 4 months on top of the initial healing period, so total recovery from a fusion procedure can realistically stretch toward a year when you count immobilization, protected weight-bearing, and strengthening.
What Rehab Looks Like After Treatment, Surgical or Not
Recovery follows a predictable arc, whether you had surgery or you’re rehabbing after a conservative program. The phases are the same; only the timelines shift.
- Protection phase. Immobilization in a boot or cast, or non-weight-bearing status after surgery. Goal: protect healing tissue. For conservative cases, this runs 3 to 4 weeks; for major reconstructive surgery, it can run 6 to 8 weeks.
- Early motion phase. Gentle range-of-motion work begins, often still in a protective brace. Goal: prevent stiffness without overloading repaired tissue. This typically starts around weeks 4 to 6 for surgical patients, sooner for conservative cases.
- Progressive loading phase. Weight-bearing increases, and eccentric strengthening and gait retraining ramp up. Goal: rebuild the tendon’s active support capacity. Runs roughly months 2 through 5 for surgical recoveries, months 1 through 3 for conservative programs.
- Return-to-activity phase. Advanced proprioception work, sport- or work-specific training, and gradual reintroduction of full activity. Goal: confirm the foot can handle real-world demands, not just clinic exercises.
Clinicians track objective markers along the way, not just how you feel. Single-leg heel raise capacity is one of the most common benchmarks. So is pain level during ambulation and normalized gait mechanics observed during a walking assessment. If you’re stuck at the same heel-raise count for three consecutive visits, that’s worth discussing with your therapist rather than assuming it will resolve on its own.
- Coordinate between your physical therapist, your surgeon or primary provider, and any orthotist fitting your brace. Fragmented communication is one of the most common reasons rehab stalls.
- Reintroduce sport or physically demanding work gradually, in stages, not all at once the week your boot comes off.
- If pain returns as activity increases, that’s a signal to hold at your current level for another week or two, not necessarily a sign something has failed.
What the Evidence Says About Outcomes
The 3 to 6 month conservative window isn’t an arbitrary number clinicians picked to make patients wait. It reflects how long connective tissue genuinely takes to remodel under progressive load, and multiple clinical sources converge on that same range before recommending a surgical consult.
The strongest piece of evidence behind the exercise-forward approach comes from a 2025 systematic review and meta-analysis showing that orthotics paired with targeted strengthening outperformed orthotics or stretching alone, with a reported P value under 0.0001. In plain terms, that’s a statistically robust difference, not a marginal trend that could be explained by chance. Clinically, it means a brace sitting in your closet doing nothing but supporting your arch is leaving real recovery potential on the table.
Prognosis differs sharply by stage, and it’s worth being honest about that up front. Stage I and early stage II patients commonly recover well with nonsurgical care alone, often returning to their prior activity level within the 3 to 6 month window. Stage III and IV patients more often require reconstructive surgery, and while these procedures reliably improve pain and function, they don’t always restore the foot to its exact pre-injury architecture, particularly after fusion procedures that trade motion for stability.
One retrospective long-term series reported roughly 86% patient satisfaction at 10-year follow-up after certain stage II reconstructive procedures. That figure comes with real caveats: it’s retrospective data, not a randomized trial, and satisfaction doesn’t mean identical function to an uninjured foot. Still, it’s a reasonable data point for setting expectations if surgery becomes your path. The honest summary: early treatment buys you the best odds of a full nonsurgical recovery, and later-stage surgery, while often successful, is aimed at pain relief and restored function rather than turning back the clock entirely.
Warning Signs That Need Urgent Attention
Most PTTD symptoms develop gradually, which is exactly why sudden changes deserve immediate attention rather than a wait-and-see approach.
- Sudden, severe pain paired with an inability to bear weight, which can signal an acute tendon rupture.
- Rapidly worsening swelling or a visibly changing foot shape over a short period.
- Numbness, tingling, or skin discoloration in the foot, which can indicate nerve or circulation involvement.
- Fever, spreading redness, or wound drainage after any surgical procedure, all signs of possible infection.
- Sudden inability to perform a single-leg heel raise when you previously could, a functional red flag for tendon failure.
If you notice any of these, contact your foot and ankle surgeon’s office the same day, or go to an emergency department if symptoms include significant swelling, fever, or an inability to bear any weight at all. Don’t try to “walk it off” or push through a home exercise program when these signs appear. Delaying immobilization on a suspected rupture can turn a repairable injury into one that requires more extensive reconstruction.
Where Hands-On Manual Therapy Fits Into PTTD Care
Manual and fascial-based therapies aren’t a replacement for the eccentric strengthening and bracing protocols that carry the strongest evidence behind them, but they play a real supporting role once the acute pain phase has settled. Approaches like the Fascial Distortion Model and myofascial soft-tissue mobilization work on the connective tissue restrictions that build up around a chronically compensating foot and ankle, including in the calf, plantar fascia, and even the hip and lower back from altered gait mechanics.
- Hands-on work can help modulate pain and improve local tissue mobility, which often makes it easier for patients to tolerate the eccentric loading program that actually rebuilds tendon strength.
- It’s generally most useful after the initial immobilization or acute pain phase, once your provider has cleared you for more active movement.
- It complements orthotic use rather than replacing it. A brace controls alignment; manual therapy addresses the soft tissue restrictions that build up around that altered mechanics pattern.
- If you’re a surgical candidate or already scheduled for a procedure, share your imaging and surgical timeline with anyone providing manual therapy so treatment stays coordinated rather than working at cross purposes.
Gait compensation is the piece people underestimate most. When the arch collapses, the whole kinetic chain adjusts, and hip and core stability play a real role in how much load the medial arch absorbs during walking. Focusing exclusively on the foot while ignoring hip weakness or restricted proximal mobility is a documented pitfall in long-term management. If you’re working through a structured strengthening plan, a related tendinitis treatment approach that addresses tendon loading principles more broadly can round out what your physical therapist is already doing.
Pro Tip: If your gait still looks compensated (favoring the outside of your foot, hip drop on the affected side) after your pain has calmed down, ask your manual therapist to assess proximal chain restrictions, not just the ankle itself. Loosening a tight hip flexor or restricted thoracolumbar fascia can measurably change how much strain reaches the tendon with every step, without adding any direct load to a tendon that’s still healing.
How I’d Actually Manage This If You Were My Patient
The biggest mistake I see with PTTD isn’t skipping treatment. It’s treating “conservative care” as synonymous with “just rest it.” Rest calms pain temporarily; it does nothing to rebuild the tendon’s capacity to do its job. My approach prioritizes early active rehab and orthotic support together, uses immobilization selectively rather than as a default first step, and sets a hard checkpoint for surgical referral if there’s no meaningful progress by month 3, not month 6.
Waiting the full 6 months to reassess is often too passive. If a patient hasn’t moved the needle on pain or heel-raise capacity by the 8 to 10 week mark, that’s useful information, not a reason to keep doing exactly the same thing for four more months. Adjust the program, escalate bracing, or start the surgical conversation early enough that it’s a planned decision rather than a last resort.
A few things I’d tell any patient managing this:
- See your physical therapist or manual provider on a consistent enough schedule (weekly early on) that someone is actually tracking your heel-raise numbers and gait pattern over time, not just asking how you feel.
- If you’re building a case for surgical referral, document specific functional failures: can’t stand through a work shift, can’t walk the dog around the block, not just “it still hurts sometimes.”
- Set goals around function, not perfection. A stage II patient who avoids surgery and returns to walking and light activity pain-free has had a successful outcome, even if the arch never looks exactly like it did at 25.
- Integrate hands-on therapy as an accelerant to the exercise program, not a substitute for it.
Hands-on therapy has a real place in this picture, but it works best layered onto a program that’s already doing the strengthening work the tendon needs.
How Thetxroom Supports Nonsurgical PTTD Recovery
If you’re navigating the conservative care window and want hands-on support that actually coordinates with your strengthening program, Thetxroom offers a more direct path than piecing together separate providers on your own. Using the Fascial Distortion Model, Thetxroom addresses the soft-tissue restrictions and gait compensation patterns that build up around a stressed posterior tibial tendon, working alongside your orthotic and physical therapy plan rather than in isolation.
At an initial visit, Thetxroom evaluates your movement pattern, identifies fascial restrictions contributing to compensatory strain, and builds a treatment plan that fits into your existing rehab timeline. If you’re already seeing a physical therapist or surgeon, bring your imaging and any prior therapy notes so care stays coordinated rather than duplicated. Thetxroom’s hands-on approach pairs particularly well with the eccentric strengthening work covered above, and it draws on the same soft-tissue principles used in Thetxroom’s tendinitis care and its Fascial Distortion Model approach to musculoskeletal injury generally. If your gait has shifted from months of favoring one foot, addressing range of motion limitations elsewhere in the kinetic chain often matters just as much as the tendon itself. Book an evaluation with Thetxroom to see where hands-on therapy fits into your recovery plan.
Frequently Asked Questions
How long does posterior tibial tendon dysfunction treatment usually take?
Conservative treatment typically runs 3 to 6 months, with acute tendinitis sometimes improving in a matter of weeks. If surgery becomes necessary, add another 2 to 4 months of dedicated post-operative rehabilitation on top of the initial recovery period.
Can PTTD be treated without surgery?
Yes, especially at stage I or II. A combination of orthotics or bracing, eccentric strengthening exercises, activity modification, and sometimes short-term immobilization resolves most early-stage cases without ever needing an operation.
Are steroid injections a good option for PTTD?
Generally no. Corticosteroid injections into a degenerative posterior tibial tendon can worsen the underlying tendon breakdown and raise rupture risk, so most clinicians avoid them for this specific condition.
What exercises help posterior tibial tendon dysfunction the most?
Eccentric loading exercises (like slow, controlled heel raises with a focus on the lowering phase) and intrinsic foot muscle strengthening are the two categories with the strongest support, since they rebuild the tendon’s own capacity to stabilize the arch.
How do I know if I need surgery for PTTD?
Surgery becomes a real consideration if a genuine 3 to 6 month conservative program hasn’t helped, if your deformity is progressive or rigid, or if imaging confirms a tendon rupture. Persistent, severe functional limitation despite proper bracing is another key signal.
Sources
These are the clinical references worth bringing to your own surgeon or physical therapist if you want to discuss your specific treatment plan in more depth.
- Posterior Tibial Tendon Dysfunction(Archived) – StatPearls – NCBI Bookshelf
- Non-operative and operative management of posterior tibialis tendon dysfunction – A systematic review and meta-analysis
- Posterior Tibial Tendonitis, Tendinosis & Tendon Dysfunction – Cleveland Clinic
- Tendinopathies of the Foot and Ankle | American Family Physician (AAFP)